There are four main parts to launching a reporting cycle:
- Identify portfolio: use existing or create a new one
- Add investments: use bulk import or one-by-one
- Notify grantees: typically includes provision of grantee training + resources
- Monitor reporting compliance
Don't forget to review our Successful Reporting Checklist which provides high-level guidance on what is required to ensue a smooth reporting cycle.
1. Identify portfolio
- Log in to your donor account with credentials as provided by True Impact.
- Click on the "Portfolios" section of your account.
- If the portfolio you'd like to work within already exists, skip ahead to the "Add investments" guidance.
- If the portfolio you'd like to work with does not exist yet, it will need to be added. If you need to add a new portfolio, please contact True Impact so they can provide guidance related to the logic models that you will use for the portfolios.
- In the "Portfolio" section click on the "New Portfolio" button on the top left.
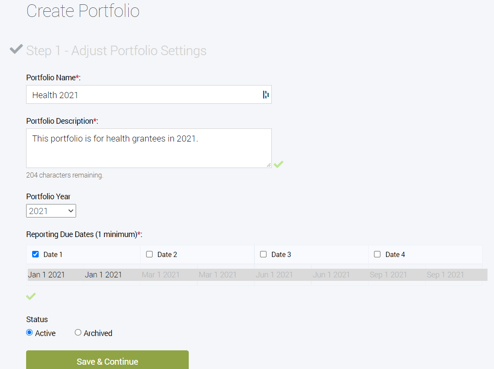
- Step 1 // Adjust Portfolio Settings: complete the information required in Step 1 and click on "Save & Continue."
- Title: we recommend including the year in your title, as shown below. Even though it will show as a duplicate in parts of the platform, it will be useful for data roll up purposes.
- Portfolio Description: Use this space to briefly state what the portfolio will be used for.
- Portfolio Year: Select one year. If your portfolio spans several years, select a year that will be most helpful such as the first year of the range.
- Reporting Due Dates: Select Date 1 and move on. This section is not currently utilized for any purpose.
- Status: Select "Active."
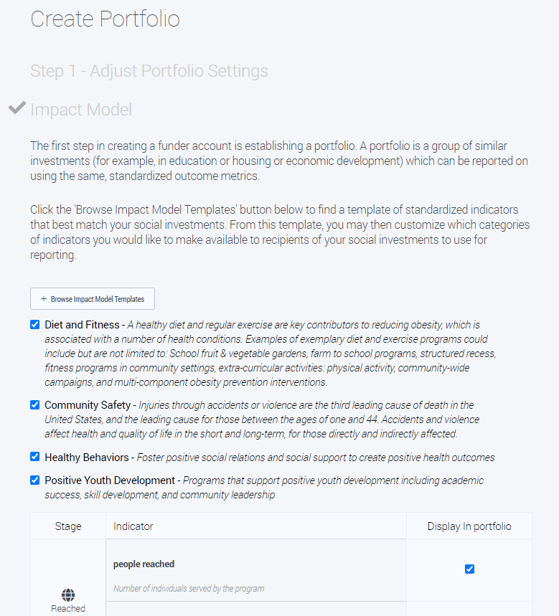
- Step 2 // Impact Model: Based on guidance from True Impact, select the appropriate Impact Model Template. It is critical that you work with True Impact in making this selection so that we may help ensure your Portfolio will provide the appropriate options to your grantees for their logic model selection. You may select the appropriate logic model templates by using CTRL + F to search for the title that True Impact has provided you with and clicking on the underlined phrase. It will take you to the following screen. Click on the first indicator in the list as "Display in portfolio," scroll down, and click "Save and Continue." Note that you do not need to click on all the displayed indicators.
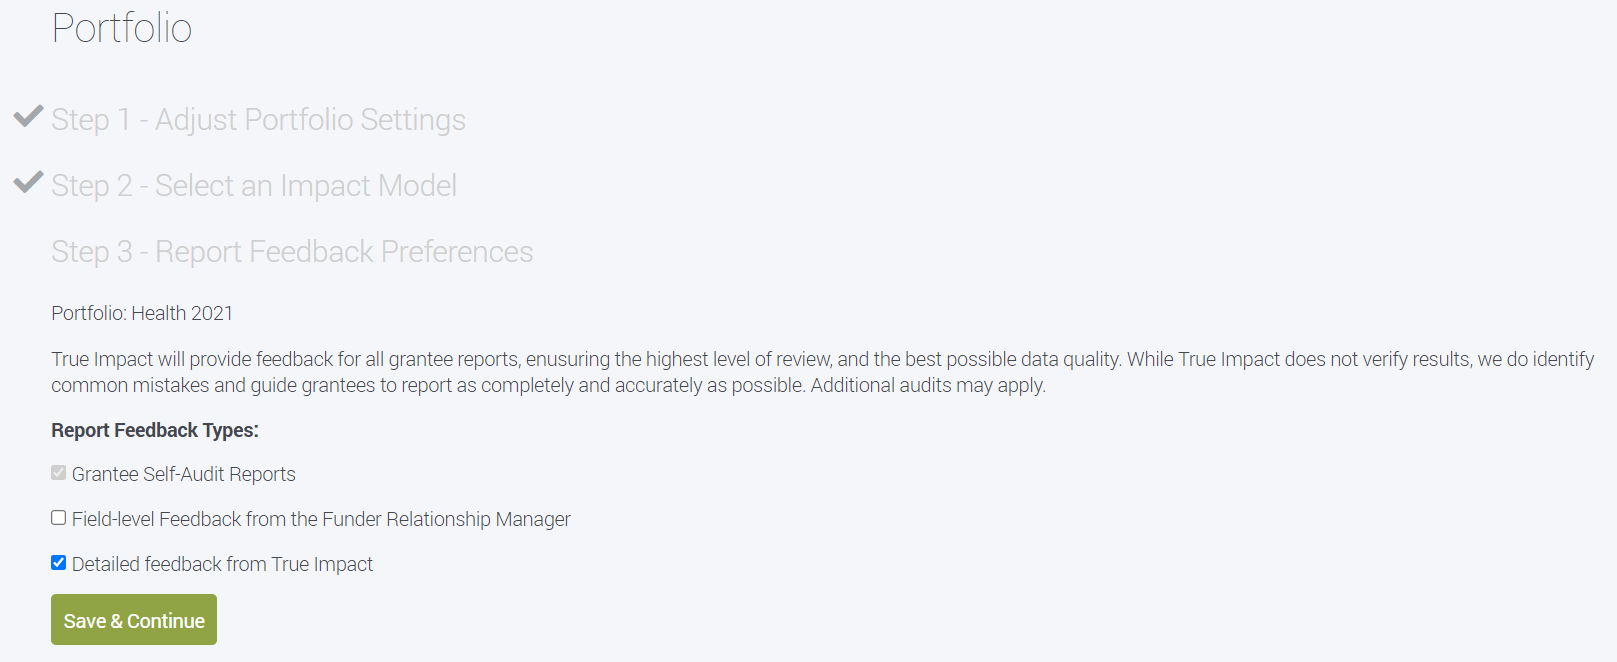
- Step 3 // Report Feedback Preferences: Select the appropriate check marks for your context then click "Save & Continue.".
- Grantee Self-Audit Reports: this is a required feedback type. Leave as is.
- Field-level Feedback from the Funder Relationship Manager: select if the donor would like an opportunity to provide feedback on every report before they are published.
- Detailed Feedback from True Impact: select if the donor would like to provide the True Impact team with an opportunity to provide feedback on every report before they are published.
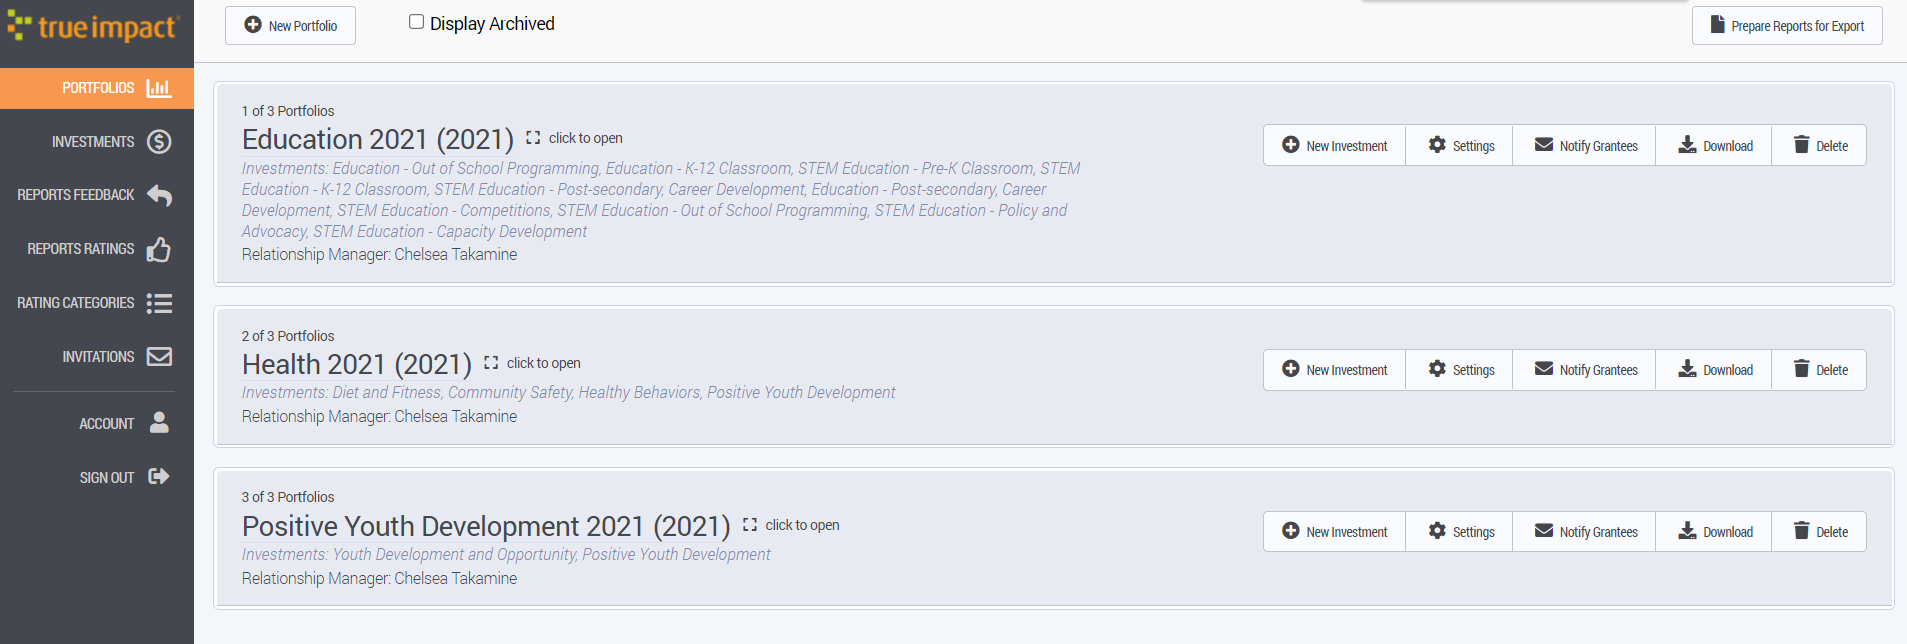
- Your new portfolio should now appear in your portfolio list. You can always edit these settings by clicking on "Settings" for the respective portfolio. Contact True Impact if you have questions about deleting a portfolio.
2. Add investments
- In order to add investments to a portfolio, click the "New Investment" button in the portfolio section.
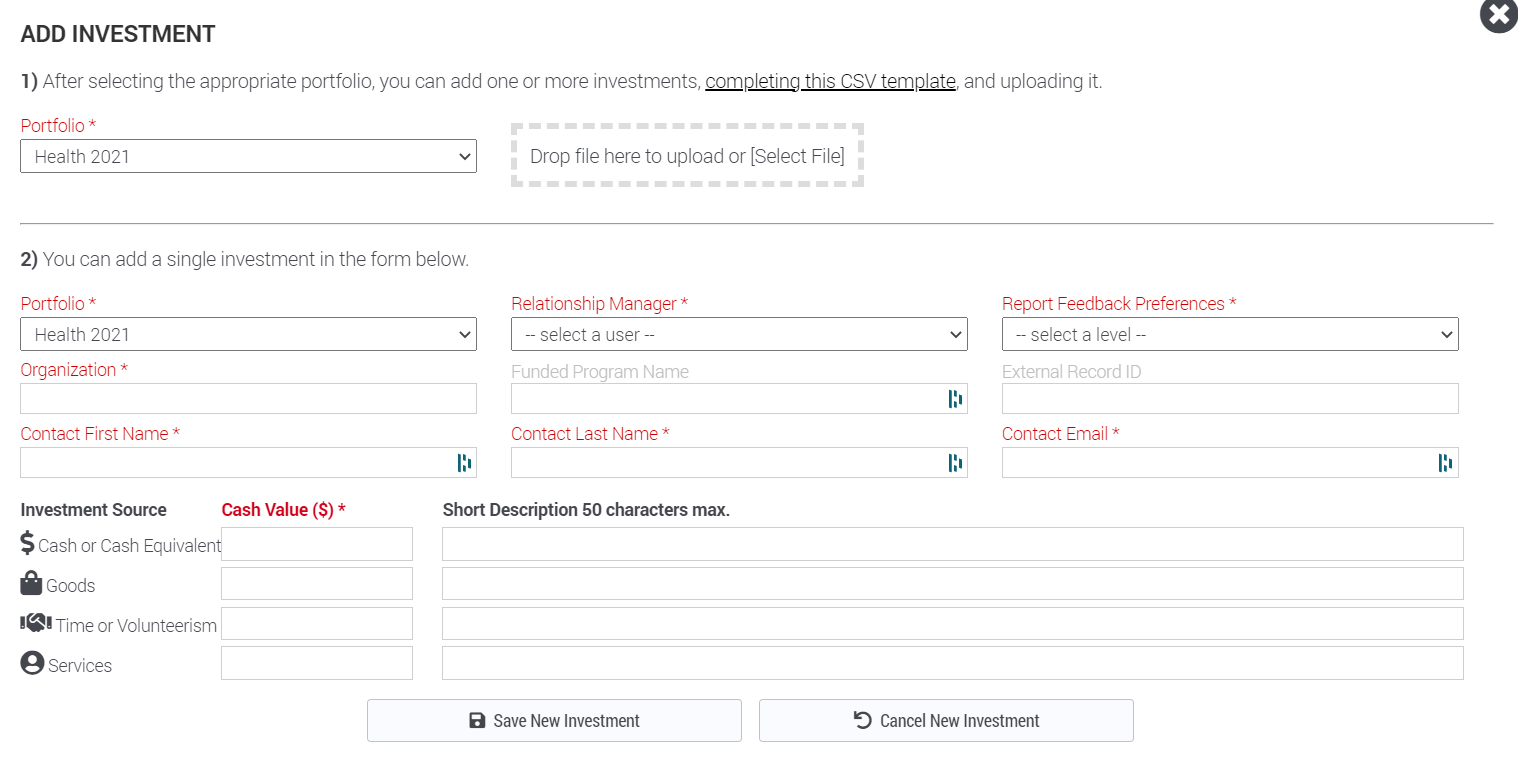
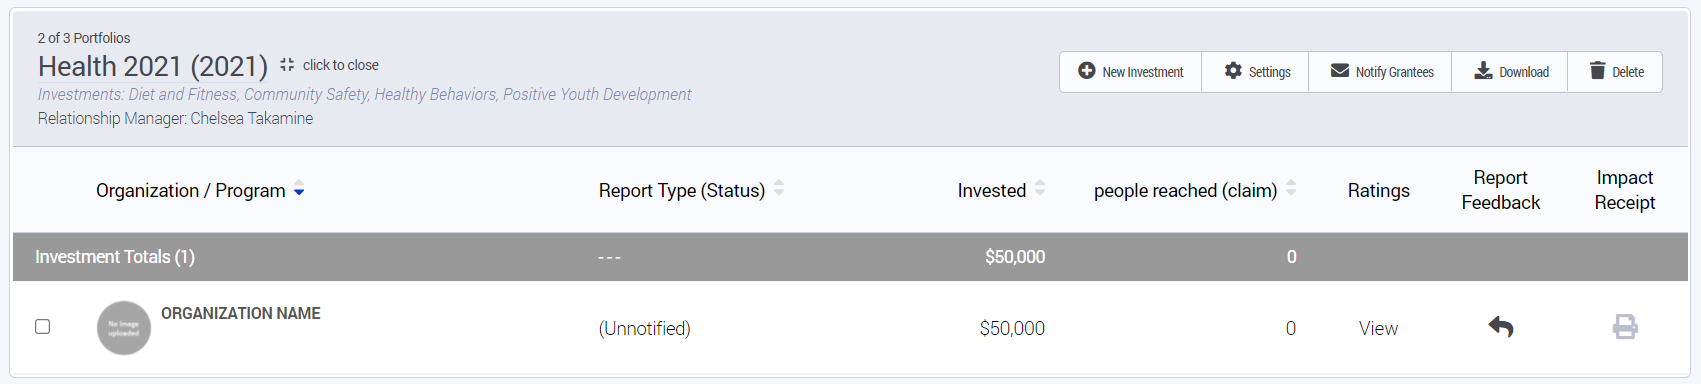
- The Investments section of that Portfolio will open. You will have two options: adding investments manually one-by-one or to add multiple investments via a CSV upload. Follow the appropriate guidance below then click "Save & Continue" to return to the "Portfolios" section of your account. Once added, you will see the status of the newly added organizations listed as "Unnotified." Keep in mind that no grantees will be notified automatically. Notification occurs in the next step of this process, as customized by the donor.
- Adding one-by-one:
- Complete the information required in the "Add Investment" menu.
- Click "Save New Investment." By clicking this button, the grantee will *not* yet be notified. It will simply be adding the investment to your internal list.
- Repeat this as needed.
- Though it is not required, adding the "Funded Program Name" can be useful for grantee notification later in the process.
- Be sure to select the correct "Report Feedback Preferences" based on the selections that you made earlier in the process (scroll up to "Identify Portfolio" to review these definitions).
- If you'd like a new option to be available as a Relationship Manager, follow the guidance here to add a new team member to your account. Once added, they will appear as an option in this drop-down menu.
- Uploading via CSV file:
- Click on the "completing this CSV template" link at the top of the section to download the CSV template.
- Complete the CSV template. You must keep the template format as is in order for the upload to work properly. Be sure to avoid punctuation (such as commas or $) in these fields as this can lead to upload errors. If you don't need to utilize a specific field(s), please leave the field there in header row and do not delete or hide them. You will need to insert the value 0 into any of the $$$ fields that you don't have investments in. For example, if you have 100 in the cash field and that's the only investment, please use 0 for the Goods, Volunteer, and Services Amount fields. Save this completed document as a .csv to your computer. Also, all fields have a character limit of 100 so any program or organization names that are longer than 100 characters will need to be edited.
- Upload the document in the appropriate area of the "Add Investments" menu. This upload may take some time. Please be patient as the information uploads and renders in the system.
3. Notify grantees
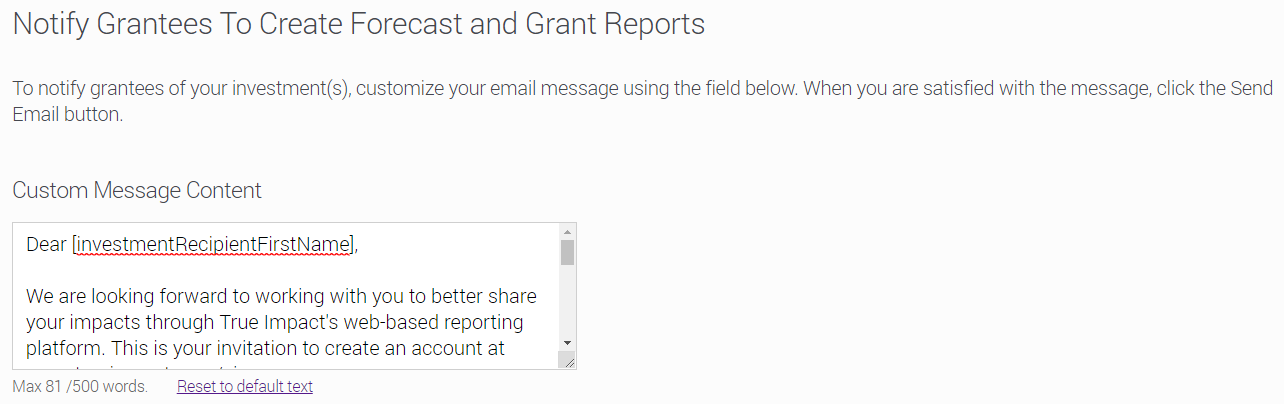
- In order to activate the investments, the grantees must be notified via the "Notify Grantee" button in the portfolio heading. Click on "Notify Grantee." If you're adding investments for grantees with existing True Impact accounts, note that the new investment will not appear in their account until they are notified via this process.
- A grantee notification screen will appear. In this screen you'll be able to customize a batch of grantee notification emails. It will default to a message that is not relevant for you. Take time to craft the email that you'd like to be sent to your grantees. You can either send as a batch or send one by one. Note that you can utilize fields listed below to personalize these messages even if sent in batch. These fields will pre-populate all the messages that are sent based on the information that you have included when adding investments to the platform.
- [investmentRecipientFirstName]: Grant contact first name
- [investmentRecipientLastName]: Grant contact last name
- [investmentAmount]: Grant amount
- [investmentRecipientOrganization]: Organization name
- [portfolioName]: Name of Funder's grant portfolio
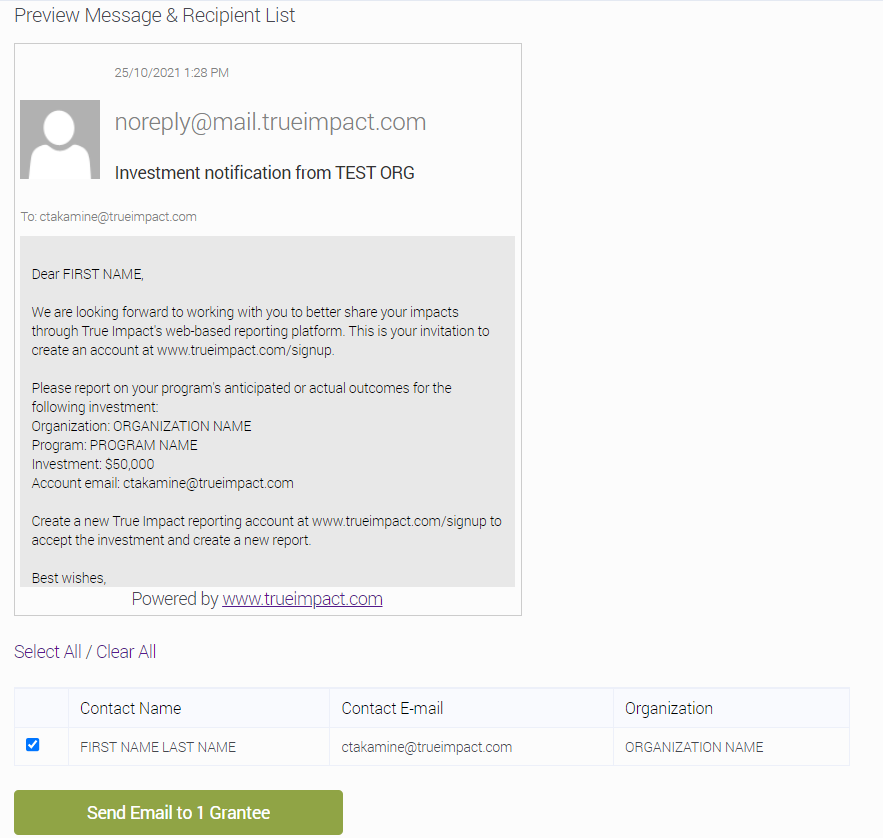
- Once your email is formatted, view the email in the Preview Message & Recipient List window. Select all grantees who have not been invited to the platform in the section below, and click the green button, Send Email to X Grantees. Note that you cannot send an email to a grantee who has already allocated the investment, so make sure that you only check new grantee names in the portfolio list.
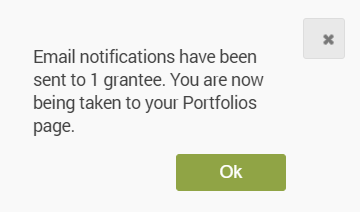
- A popup will appear: "Email notifications have been sent to X grantees." You will then be directed back to your "Portfolios" page.
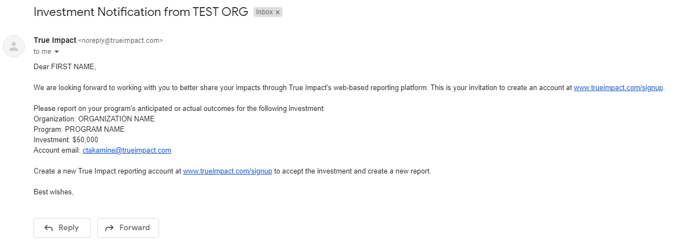
- You are welcome to test the functionality by sending a notification to a test investment with your email address if you would like. You can later delete these. A screenshot of what these emails looks like can be found below. The capitalized words are what we entered in the test investment (we entered them as capitalized words so they would stand out here, they will be lowercase if you enter them as such).
- The grantees have now been officially invited to log in to the platform and attach your investment to a report. Note that it is very important that the grantee utilize the email you provided to log in and allocate the investment.
- At this stage, we recommend following up either one-on-one or via a batch email communication with supporting guidance regarding reporting timeline, training, a resource page, etc. Contact your True Impact Client Success Manager for email templates, customized reporting resource page (here's an example of a general one) and training information/guidance. You are also welcome to include this information in the automated platform message, but we find that it can be helpful to create an email thread with the organizations that they can easily reply to with questions. Keep in mind there are grantee-focused Help Center articles available addressing common questions.
4. Monitor reporting compliance
- In the "Portfolios" section of your account you can click to expand each portfolio and view the status of each report there. This information can also be downloaded to an Excel file by clicking on the "Download" button in the top right area of each portfolio. The status types are defined as such:
- Waiting: the grantee has not yet allocated the investment to a report
- Draft: the grantee has allocated the investment to a report
- Awaiting Feedback: the grantee has submitted their initial report for review
- Published: the report has been updated and is considered published, the grantee can still make edits to the report
- Finalized: the report has been updated and is finalized, the grantee can no longer make edits to the report (this is an optional stage, we tend to leave reports in the Published status to allow for easier updates)

- If you have completed previous reporting cycles with True Impact you may already have a Data Dashboard configured. If you have a Data Dashboard, you will have a tab dedicated to report compliance. Contact your True Impact Client Success Manager for more information regarding your data dashboard and any additional configuration that may be helpful to monitor compliance.